Wednesday, April 17, 2013

Hard but rewarding-Homemade Gift Exchange ONLINE

Hard but rewarding- Homemade Gift Exchange Online

This winter I participated in a ALL HOMEMADE Holiday Gift exchange online through a fellow blogger. 
It was all handled online with a gift exchange service. You sign up the service gives the opportunity to enter your likes and dislikes and some basic info so your gift maker has an idea of what to make you.  

Then here is the kicker the person you get is chosen for you and you can ask a few interview questions to help you get to know them better but you have to create an ALL HOMEMADE gift for that person based on what you learned. 

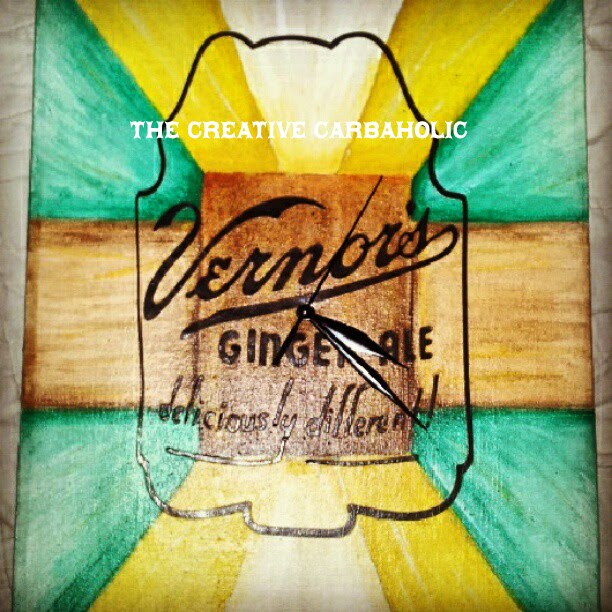
My person liked clocks, she collected them and had many in her home. She also liked traveling and NASCAR and several food items including Vernor's Ginger Ale. It is not sold everywhere but really is one of the best ginger ale's around. I had a former room mate who loved it and that is how I was introduced. 

I used what I had on hand as the rules stated and coupled that with the info I had gleaned from my "person" and started creating. 

I took a canvas and painted a rustic twelve section pattern with the focal point being the center of the canvas. 
To map out my sections I  devised a crazy way that probably makes no sense to anyone but me but it worked so I am happy. 
I used a ruler and lightly drew a line diagonally from corner to corner, creating a large X. Then I created a large rectangle in the center by connecting the horizontal lines using the X as my corner points. I could have measured from the corners in toward the center to see if it was perfect but its art and art is not meant to be perfection just creative so I just ran with it as is.
Then using the ruler I divided up the rest of the face of the canvas until I had twelve total areas not counting the center rectangle. Once it was all divided I poked my hole in the dead center for the clock works to go into. 
All ready for paint. I chose a color scheme that my person liked and that also was a scheme from the Vernor's label. Then I tried to give it a tropical or rustic tribal feel by antiquing and giving high and lowlights here and there. I really liked it as it was with no label but I wanted it to be what my person liked. So I recreated the Vernor's label and placed it on top of my now dry paint. I used mod podge both to adhere and seal the label to the canvas and then I used a few good thick layers to the top to seal it all good. 
To hide the tacks on the sides of the canvas I took a satin ribbon in a dark chocolate brown and hot glued it to the edge all the way around the outside. 
As soon as the clock works were in I was so happy with it and I hoped my new friend was too. My new friend, aka my person, turned out to be my gift giver too and she sent me an adorable candle holder. 

At first this experience had me stumped, scared, confused and then finally challenged. It was really fun to do and I made a new friend to boot! I think I will take part again next year. 
Have you ever participated in an online gift exchange?

Thanks for stopping by. Please follow me using my buttons. THANK YOU!!
Carolyn


Monday, April 15, 2013

Here puppy, puppy, puppy!

Fido's got a brand new "bone"

We spent the weekend making a few dog toys.
They are super easy and a great project for boys or girls alike.  I made these with my two sons. We rarely get to craft together because crafts tend to lean toward girly stuff. This craft is all about the dogs and my boys each have a dog.  A house with two boys and two dogs needs TOYS!

Here is how we did it. 
We made two dog toys. They are a rope type tugging toy. 
We used two different colors of old t shirts (children's size 6/7 or 8/9) for each toy. 
So you will need two shirts per toy you plan to make. 


In hind sight the boys should have worn the shirts or slept with them in their bed with them first. This allows the boys stink.... scratch that..... the boys smell ; ) on the shirts. This smell is what the dogs associate with their "pet", and their "pet" is my boys.  It helps the dogs want to play with the toys. If you forget like we did just throw them in a dog food bucket or bag and let them sit a few days. The dogs will be interested in the smell after that.

First lay one shirt out flat and fan fold the shirt from the bottom, up to the armpits. You should get about three folds, resulting in four sections total. 

Cut from side to side or left rib  to right rib along the folds. 
Once you have these cut find one side or a side seam. Cut once and only once, to make one long strip. 
Repeat with shirt number two. 


Now take three strips (one from each shirt and a third from whichever shirt you like) together about six inches from the cut end and tie one big knot. Then braid the strips tightly together, tightly. Pull each braid tight and it creates a stronger toy. 


Side Note: You don't need two different colors but I found with my boys the two different colors helped them learning to braid. Once you reach about the last six inches tie the ends in one big knot. You repeat until all of the strips you cut are braided and tied off on both ends.  If your shirt has a logo on it turn those pieces as you braid so that the inked section is to the inside. 

 I told my boys that this was how cowboys used to make a rope because braiding sounded way too girlie. And, I think it would have worked except their younger sister pointed out that I braid her hair like that..... sigh. : 0 

Anyways they finished their braids, I mean ropes, and it only took them about 20 minutes total. My boys are tween's and that is about as long as I keep their attention without a Wii being involved.
Once you have three complete braids, braid them together, tying them the same way.  


Now here is where I learned that my tween boys are getting VERY STRONG.
One boy and one rope at a time, we each took an opposite end and PULLED. Pull these ropes as hard as possible. Your dogs are a lot stronger than you are and you want these toys to last at least a few days : ).
The t shirt material stretches to some extent but when you release the material tightens the knot really well. 


My boys about pulled me over, several times, which they loved and laughed hysterically about. Which was a fun bonding moment that we rarely get in a crafting setting.

Enjoy making and playing with your new dog toy, rope, tug, bone whatever you want to call it.


UPDATE: We are at the one week mark and the ropes have been used a little and they have held up well. 

I appreciate your input.
I would also love for you to follow me. Click the follow me button on the side bar.

THANK YOU!
Carolyn


Thursday, April 4, 2013

SOOOOO What now?

SOOOO what now?

I had weeks, literally weeks of blogs typed, photos composed, arranged, edited and uploaded and all of my posts were set to be automatically delivered via this lovely BLOGGER schedule option. Yep seasonal fun galore. Did they post? NOPE, NADA, NICHE, NILCH. They did not.


Upon finding this out this morning, this is the face I made  Original Grumpy Cat Ok maybe not but it was really close. This is Grumpy Cat and if you want more grumpy looks and silly comments please visit his site. www.grumpycats.com


So do I go ahead and release these posts from their purgatory and publish them as I had originally intended them to be released. OR do I just start over and wait until Valentines, Easter, St. Patricks day, Spring Break etc.... all roll back around and publish them at that time?

What do you think?